Easily amused

I like that my Garmin GPS actually speaks the street names. The voice does pretty well with most streets, but sometimes her voice goes up high and she has trouble getting back to a normal level. This makes me smile.

First, let’s listen to her getting excited about Pumpkin Drive. I don’t blame her. Street names in Cupertino are kind of awesome. You take Bubb Road to Pumpkin Drive, and then maybe hang out on Rainbow Drive later. Just make sure you don’t get stuck on an Infinite Loop.

I also find it funny when she says “Mountain View Alviso Road.”

Quick intro to creating podcasts

Beah recently complained about my short blog entries, so I just found an easy way to make a long one: copy and paste from an email! I was recently asked to help out a friend of a friend with video content on a website. Since this advice can apply to a lot of people, I see no reason to keep it exclusive to a few people. I haven’t edited this so it may not read very well for a blog entry, but in any case, here’s a snippet of the message:

Flash video is great for drive-by viewings by people who are new to your site. It plays right in the web browser, almost anyone with a computer will be able to watch it without installing anything, and the quality/size ratio tends to be reasonable. However, if your visitors will want the videos to be more portable, or if you have a lot of repeat visitors (subscribers), then you might want to consider doing an actual video podcast instead of simply embedding a file in a webpage.

In case you’re unfamiliar, here’s the deal with a podcast:
It’s an XML feed that your users subscribe to, just like they may subscribe to an RSS feed for a blog. That way, instead of users having to constantly check your site for new videos, they can simply subscribe and be notified when new content is available. And, if they subscribe using a podcast-capable aggregator such as iTunes, the video is automatically downloaded in the background, ready for instant viewing anytime even if the user is offline. It can also sync to portable devices such as the iPod/iPhone, and can be listed in podcast directories, such as the one built into iTunes.

I design my podcast around Apple’s specs, since iPod/iTunes is likely the most popular solution for viewing podcasts: http://www.apple.com/itunes/store/podcaststechspecs.html
For my own personal videos, here’s what I do:
– Podcast feed, containing iPod-compatible videos, hosted on my site for subscribers
– Videos syndicated on a YouTube playlist for YouTube subscribers, as well as for embedding videos on my site for those first-time/drive-by visitors who want instant gratification. 

I create the Podcast feed using Podcast Maker, which is $30, but I think you can actually do it for free now using the current GarageBand. If you’re not on a Mac, I’m sure your favorite search engine will be able to help you out in finding similar software.

Destiny

I grew up in Pennsylvania and majored in Film & Media Studies. So how did I end up working in California for Google? Until now, I thought it was just luck. But thanks to, well, Google, I now know that it has always been my destiny.

Google Translate now offers translations from Polish to English. While using my handy English bookmarklet to view a Polish page earlier tonight, I noticed that the word “Wysz,” which I had initially assumed to be someone’s last name, was translated to “Search.” That’s right, as far as I can tell, the Polish word for search is wysz. What do I work on at Google? Search. It was meant to be.

Disclaimer

Dork alert!

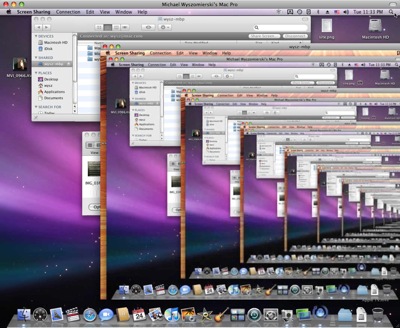
Even though I work for the Internet, I’m still often told by my coworkers that I’m a little dorky. I used to think this was a bit odd coming from them, but tonight I caught myself setting up a video feedback loop using screen sharing between my laptop and desktop. And then taking a screenshot of it. And blogging it. Yeah, I’m a dork.

Screenshot of screen sharing loop

Mobile blogging

Mike just let me know about a WordPress plugin called WPhone which will allow me to post to this blog using my iPhone. I’m writing this entry from my laptop, but I’ll try to road test the plugin tomorrow when I’m really on the road. I’m going up to the Oakland zoo to do some “habitat restoration” volunteer work. We’ll see what that means tomorrow… stay tuned for the report, which I’ll try to tap out and publish on the bus.

WALL•E

I told you I was going to write about something happy.

Tomorrow night, I will watch WALL•E, the new movie from Pixar. The movie isn’t going to be released in theaters until June 27th, so how am I going to see it? Well, I’m going straight to the source. I’ll be watching it in Pixar’s own digital theater at their headquarters in Emeryville. I’m really excited, and can’t imagine any better conditions for watching a movie. I’ve never been to a full res digital screening before.

I’ll be signing a confidentiality agreement, so don’t worry about seeing any spoilers about the movie or what goes on at Pixar’s campus on this blog.

Even though I haven’t seen it yet, I’m going to go ahead and recommend that you see this movie. You can watch the trailers and some fun vignettes here.

Google Earth vs. Reality: The Tutorial

Jason recently blogged about a new hobby — comparing photographs of physical locations to their renderings in Google Earth. I had nothing better to do tonight, so I decided to try it out myself. Instead of switching back and forth between a photo and Google Earth, I wanted to find a way to overlay an image on the program while I navigated Google’s vision of Earth. Jason suggested this may be possible using KML, but I wanted to just whip up something quickly, and didn’t feel like learning a new markup language tonight. I remembered reading about a hack that lets you keep Dashboard widgets persistent in floating windows as you work in other applications, so I decided to look for a solution using that.

The funny thing is, I’ve never written a Dashboard widget before. But I’ll tell you right now: I created what I wanted in five minutes using Dashcode, without ever launching the application before or writing a single line of code. Here’s how I did it:

  1. Open Terminal and type (or paste) the following command, which enables the hack, and then hit Enter:
    defaults write com.apple.dashboard devmode YES
  2. Restart the Dock by running this command:
    killall Dock
  3. Open Dashcode. If it’s not on your computer, look for the Developer Tools disk that came with your Mac or copy of OS X.
  4. It will ask you to choose a template. Choose Custom.
  5. Select the background image and “Hello, World!” text in the template and hit the delete key to remove them.
  6. You’ll probably want to look at your photo a little larger, so expand the size of the widget by grabbing the bottom-right corner of the checkered area and dragging it to a reasonable size.
  7. Drag your real-world image onto the checkered area. I found three ways to do this:
    If your photo is in your iPhoto library:
    Click the Library button in the upper-right corner of the window, then choose the Photos tab. Drag and drop.
    If your photo is already open somewhere or you see the file in Finder:
    Drag it directly from Finder or the other application onto the checkered area. If it’s open in another application, try dragging the file name directly from the title bar. Neat, huh?
    If your photo is hidden somewhere:
    Choose Add File… from the File menu, and navigate to the photo that way. It will appear in the Files listing in the bottom-left corner of Dashcode, and you can drag it from there.
  8. Resize your image as necessary, and place it wherever you want in the checkered canvas, which will be the visible area of the widget. If you want to make sure it’s displayed at its original resolution, click on it once and then click on the Inspector button. You can change the dimensions under the metrics tab (ruler icon).
  9. Using the same Inspector window (I seriously love apps which use the Inspector, especially if it’s my first time using them), open the Fill & Stroke tab (rectangle/circle icon) and adjust the opacity to something less than 100%, so you’ll be able to see the Google Earth image under yours.
  10. In the File menu, choose Deploy Widget to Dashboard… and give it a name. Click Deply.
  11. Dashboard will launch and ask if you want to install the widget. Click Install.
  12. Dasboard will then ask you if you want to keep the very widget that you just installed a second ago. Click Keep.
  13. Finally, you can take advantage of the hack we did in step 1. Click and drag on your new widget, just so that you move it a little. Then, while still holding the mouse button down, press F12 to exit Dashboard. Your photo will remain as a translucent floating image, allowing you to work with other applications under it (as long as you don’t click directly on the image).
  14. After you’ve lined everything up in Google Earth and want to get rid of the image, click and drag on the image, and again while still holding down the mouse, press F12 to re-engage Dashboard. It will then disappear when you exit Dashboard.

I don’t know how you want to present your final comparisons, so I’ll leave that up to you. You could just take a screenshot of the whole deal if you want a transparent overlay, or you could line them up Jason-style for side-by-side comparisons. You may also notice that my widget is pretty primitive… but as I wrote earlier, it was my first time making one and I was able to do it without writing any code. Maybe someday I’ll work on one that allows you to change the photo directly from the widget. For now, you can just change the photo in Dashcode and redeploy. If you keep the same name, Dashboard should recognize it as the same widget and ask if you want to replace it.

As Jason suggested to me, if you already have your photo geotagged, that gives you a great starting point in Google Earth. I did some geotagging on Flickr a few years ago (I’m still working on updating my Picasa Web Albums data), so I thought it pretty easy for me to find something to get started with. However, I found I didn’t have very many geotagged photos of landscapes, so my options would be limited to comparing photographs to data on the 3D buildings layer (too bad I don’t have digital shots from Disney World) or Street View. I’ll have to take a closer look at my photo library and show you if I find anything cool.

Once you find out exactly where a photo should be placed, you can easily stick it into Google Earth using this software, which will generate the KML file for you.

As usual, when I talk tech please remember my disclaimer.
Geek dream for the future

Today I read an article (after being tipped off by Santosh) about a futurist named Ray Kurzweil naming some of his predictions for the not-so-distant future. I’m not going to make any predictions, but here’s one area not covered by the article where I’d like to see major advances sooner rather than later: Transportation.

It’s obvious that we’ll make great improvements in clean energy, so I’m confident that transportation will go “green.” But something else I’d really to happen is an amazing increase in efficiency, such as the elimination of traffic jams. And mass transit isn’t always the answer. Even with gas prices where they are, I still prefer my car for most trips because it is the fastest, most convenient way to go. We need to make transportation better at all levels. Have you ever sat at a red light, and noticed that everyone else at the intersection was stopped as well? Did you feel like there were moments, if you disregarded traffic laws and safety, that you could have just gone through anyway? I do this all the time (the thinking part, not the doing!), and even though I haven’t taken math since high school, I can just feel how inefficient the current system is. The answer to the problem is simple: Humans shouldn’t drive. Computers should. Think about the amount of lives this would save with the reduction in crashes, road rage, and general stress.

Block Twitter followers who follow everyone?

If someone starts following me on Twitter, and I see that he/she is also following thousands of other people, should I just block him or her? I can’t think of a legitimate reason why someone would follow so many people. The only explanations I can come up with are that people are doing this just as a game, or doing it with the hope that those who are followed will reciprocate.

Unless someone can convince me otherwise, I’m using the block feature like it’s free.